
The Journey Concept
Interactive media offers a form of experience in which the user has limited control over the system they are using. Often this control involves navigating through content and making choices in order to achieve a goal, such as sending a message or paying for items purchased.
The user’s progress towards their goal in an interactive system can be thought of as a journey.
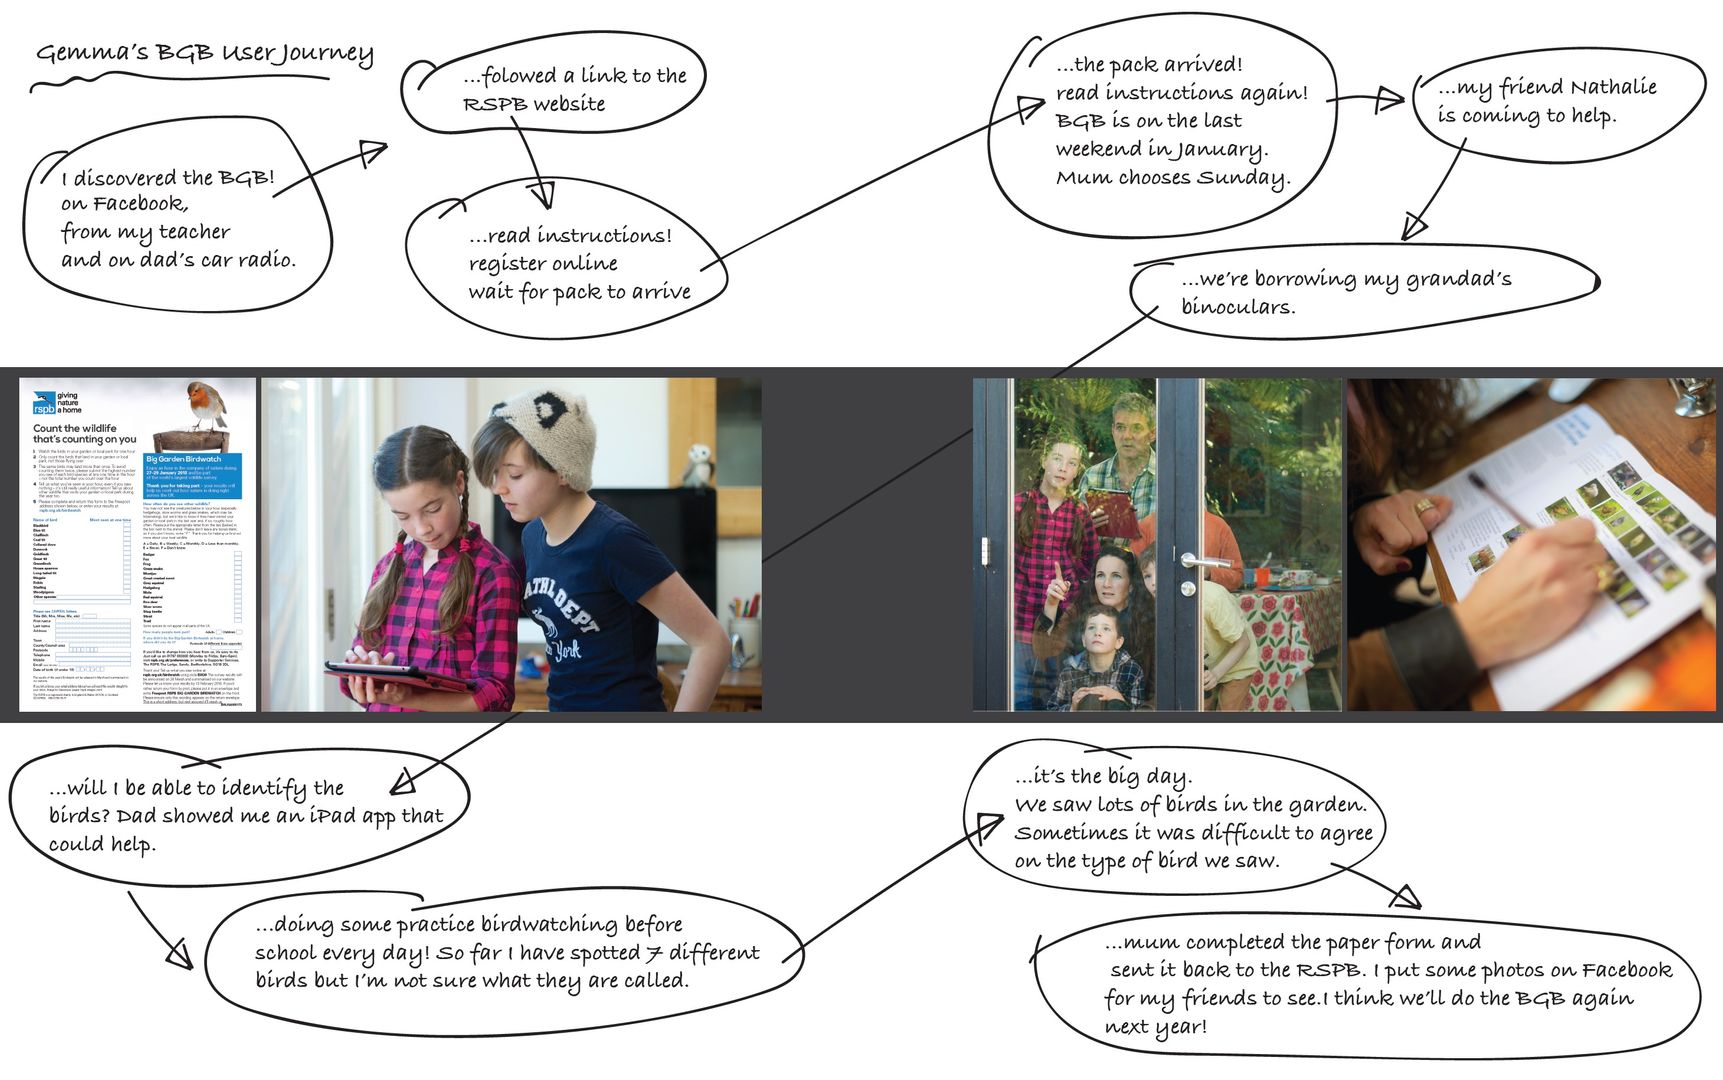
Visualising Gemma’s journey through the RSPB Big Garden Birdwatch.
A user journey is analogous to one in the physical world, having a starting point and multiple potential routes. Similarly, it is possible to get lost in an interactive system, take a wrong direction or get completely stuck. Unlike during a real journey, a user can abandon an interactive journey at any point. This can have consequences for applications and websites that rely on their users to finish tasks, such as completing a payment process and so designers need to make a user’s journey as smooth as possible.
There are at least three user journey methods in a UX Design approach that can be applied to help improve an interactive design.
- Designers can ask users to envisage a journey to help shape an early navigational design
- Insights can be derived by observing users making journeys through prototypes of the design
- Designs can be analysed to reveal data about actual user journeys once they are up and running by tracking user interactions
In this activity you will try out methods one and two, envisaging and observing, with the aim of improving the user experience in a small-scale interactive design.
Applying these methods should minimise any serious problems with user navigation before the design is deployed. Method three, live analysis, allows designers to optimise the user experience based on large amounts of data over significant time periods. It is not possible to use method three without deploying the design, but it is worth noting its existence here because it has the potential to validate the work done through envisaging and observing.
Activity requirements
You will need pencil and paper and one or more people to provide their ideas and feedback. For the optional Step 4 you will also need access to a computer and basic prototyping software.
Steps
Create a scenario
If you are working on a project, then create a scenario in which a user will use your design to complete a task and achieve a goal. Alternatively create a scenario for an imagined system, for example:"Thirteen-year-old Gemma is taking part in a nature study and needs help to identify wild birds in her garden, count the number of times she sees them in an hour and submit the information to a wildlife charity."
Ask the user to envisage the journey
Explain the scenario and ask the user to describe how they will approach the task. Depending on the user they may prefer to explain how they would achieve the task in the absence of a fully interactive system. In Gemma’s case she may refer to illustrations in a printed guide to identify different wild birds, use a note pad to record when she sees a particular type of bird and submit her research to the website by using an online form. As someone interested in UX Design you probably already see the potential for interactive media to improve the user experience for Gemma. For the purpose of this activity the last stage of the task, entering data to the website form, will provide a sufficient challenge to recognise the benefits of creating a user journey. Encourage the user to think freely, without constraints imposed by screens or website pages. Make lots of notes to use in the next step!Visualise the journey
Using pencil and paper turn the user’s ideas of the journey into a sequence of sketched frames. For Gemma’s journey, from paper notepad to entering data using a web form, visualise each step in the route identifying points at which Gemma can make a choice of direction and show these as branches from the main route. See if you can identify ‘break points’ where Gemma may take a wrong turn, get stuck or just irritated with the process. Carefully consider what changes could be made to improve the experience. Look for ways to remove the need for the user to repeat tasks such as re-entering data or looping through multiple steps that could be achieved in one stage.Make the journey (optional)
You may like to create a mock-up of the design using a quick prototype. There are many tools that can link sketch designs by making images (or parts of images) clickable. See Chapter 6 in the book.Observe users making the journey
Sit with one or more users and ask them to make the journey using the sequence of sketched frames or quick prototype as a visual aid. Keep a focus on the original scenario and remind users of their task and goal. Be alert to inevitable user comments such as ‘how do I do that?’ and ‘where do I go now?’. Answer such questions with ‘how would you like to do that?’ or ‘where do you need to go?’.
The activity will be revealing and should result in many suggested changes to the original design. These suggestions need to be recorded so that they are not missed when developing future iterations of the design.
Outcomes
If this activity has been successful then you will have revealed differences between your initial concept of the user journey, the user’s envisaged journey and the observed journey. It is likely that you will have identified ‘break points’ with the potential to alienate the user through poor interaction design. You should recognise that with relatively little effort, these methods can dramatically improve the user experience when used to help shape interaction designs. They also reduce the risk of poor or failing designs finding their way into the real world and act as insurance against live analysis proving that the initial untested designs were defective.